Middle School Art Lessons
Welcome to Middle School Art! This is not an official class, however an Art Enrichment Class designed for students who want to explore the visual arts in grades 6th-8th. Most all lessons are designed to build off of your core classes (ELA, Social Studies, Math & Science) to give you an enrichments of topics you have already learned or are currently learning. You can create your artwork out of any material you want unless otherwise stated in the project description.
How to get started:
Step #1: Read the lesson description and pre-knowledge you will need in order to complete the lesson
Step #2: Watch the YouTube Video that goes with the corresponding lesson
Step #3: Begin creating your Work of Art! Your Art project should take you at least 3 hours to complete.
Step #4: After completing your artwork, answer the reflection questions. HINT: They are the SAME reflection questions for each lesson.
Step #5: Send your artwork and reflection to your teacher! Be sure to tell what assignment you are sending! This can be done many of ways, see bullet points below to choose a method that works best for you!
Reflection Questions:
Step #2: Watch the YouTube Video that goes with the corresponding lesson
Step #3: Begin creating your Work of Art! Your Art project should take you at least 3 hours to complete.
Step #4: After completing your artwork, answer the reflection questions. HINT: They are the SAME reflection questions for each lesson.
Step #5: Send your artwork and reflection to your teacher! Be sure to tell what assignment you are sending! This can be done many of ways, see bullet points below to choose a method that works best for you!
- Email your artwork & reflection to [email protected]
- Send a Picture Text of your artwork & reflection to your teacher: (740)206-9040
- Drop off your artwork & reflection to your teacher at NDA's campus
Reflection Questions:
- Discuss your “Successes” with this project. What did you do well? What turned out the way you wanted?
- Discuss your “UN-Successes” with this project. What didn’t you like? What didn’t turn out the way you originally intended? What are you not proud of?
- What are three new things you learned from this project?
- How would you grade your project (Letter Grade or Percentage)? Please give a reason why you think that.
- If you were to re-do this project, what would you do differently? Why?
ELA Art Lessons:
Lesson #1
Personification- Giving an object human features
Project: Pick an object in your home that is meaningful to you. Create a work of art, in the medium of your choice, by personifying that object.
Lesson #2
Metaphor- figure of speech that is not meant to be taken literally and typically describes or compares objects.
Project: Pick a popular metaphor to recreate into a work of art using the medium of your choice.
lesson #3
Shape Poems- Poem that is shaped to look like the subject of the poem
Project: Write your own shape poem as a work of art.
Lesson #4
Idioms- Phrase that has a different meaning than what is actually being said. Ex. You can say that again! Really means, I agree!
Project: Research popular idioms and visually create your own!
lesson #5
Nonsense Poems- Poems that make no sense and typically have made up words.
Project: Watch the video about the Jabberwoky that you may remember from Alice in Wonderland. Once you have finished watching the video, recreate your favorite stanza from the nonsense poem. You may want to pause the video on your favorite stanza in order to gain inspiration. Rules: Cannot recreate images from Alice in Wonderland! Has to be original & authentic content.
Lesson #6
Personal Narrative- Telling a story that happened to you personally.
Project: Using the video as reference, create a personal narrative in the form of an ancient Chinese scroll. You will need to fashion multiple pieces of paper together. Your scroll should have parts. Each “part” should be a full piece of paper that is positioned horizontally. Notice in the video how the scroll is read from right to left, not left to right like Americans are used to writing. You should mimic this style as well. Please follow the parts below…
- Create a seal of ownership (This can by a symbol that represents you, I typically use a star design or heart design for my symbol of ownership)
- Frontis piece- This is where you sign the work of art
- Images of your personal narrative
- Give the title of your personal narrative and explain your artwork
Lesson #7
Propaganda- Manipulating people to enforce your agenda
Project: Create a propaganda work of art about a topic or idea that is personally meaningful to you. Be sure to explain your propaganda piece including: what is it about? Why did you choose this? How can it be considered propaganda?
Lesson #8
Fallacies- Mistaken belief that does not have a sound argument.
Project: Create an advertisement that includes a fallacy. In your reflection, be sure that you are stating what type of fallacy you created in your advertisement and why.
Social Studies Art Lessons:
Lesson #9
Ancient Egypt
Obelisk- Stone pillar typically found at the entrance of a pyramid or burial ground. Used to represent sun rays piercing the earth. Symbol of the sun god.
Project: Using cardboard, create a three dimensional Obelisk as you have learned about in the video. Then, create your own symbols to represent yourself.
Lesson #10
Ancient China
Chinese Calligraphy- is the writing of Chinese characters as an art form, combining purely visual art and interpretation of the literary meaning.
Project: After watching the video on Chinese Calligraphy, think of a few words (5-8) that describe yourself. Once you have generated a few words, research what the Chinese symbol is for each word and create a work of art out of Chinese Calligraphy.
Lesson #11
Ancient Greece
Project: Create yourself as a Greek Hero using the black figure method found in the video by using a piece of cardboard. This will create a clay like color as your background. Remember to add geometric patterns around the board to give your artwork a more Greek inspired look. Use the examples of Ancient Greek Vases as inspiration!
Lesson #12
Ancient Rome
Project: Using your knowledge of the Roman Columns in this video, take pictures of Ancient Roman Columns in your neighborhood or even city! They are everywhere! On houses, public buildings etc. See if you can find an example of each, take a picture and detail what type of column you found.
Lesson #13
Middle Ages- The Crusades
After watching the video, answer a few questions about Relics, Reliquaries and their authenticity.
- What is a relic?
- Describe one of the reliquaries from the video. Reliquary is the container the relic is held in. Be sure to describe the materials used as well as any details you notice about them.
- Authenticity- Authenticity is whether or not something is real or true. As the video states, there is not way to prove if the relics are 100% authentic. Why do you think there is so much importance placed on something that may or may not be authentic?
lesson #14
Middle Ages- Coat of Arms
Project: Create a coat of arms that represents your family. This does not have to be historically accurate. Make sure that your last or first name is displayed. Use symbols to tell about yourself! Be sure to describe what your symbols mean and why they are personally meaningful to you.
Lesson #15
Middle Ages- Illuminated Manuscripts
Project: After watching the video, create your own Manuscript Illumination book. Your book should be at least 5 pages and tell a story. Your story can be about anything you want! Be sure to illustrate your story using pictures and repeating patterns and borders. If you want, you can learn how to write in cursive! See the video below if you want to challenge yourself!
Lesson #16
Islamic Art- How to create Islamic inspired geometric patterns
Project: Using a ruler and compass, create your own Islamic inspired geometric pattern. You can use any method you would like! Do not worry if you are unable to create a perfectly symmetric design! This lesson is purely experimental. If you would like to test your skills, please see the following video on how to use a compass.
When creating your geometric patterns, please be sure to use repeating patterns and colors! You can use a pencil to create a draft of your pattern. Then, you can use either colored pencils or markers to fill in your geometric pattern with repeating colors.
Lesson #17
Byzantine Architecture- Mosaics
Watch the video above to learn about the Byzantine Empire. Next, watch the video below to learn about Byzantine Mosaics.
Project: Create your own mosaic out of construction paper and a glue stick. Be sure that you are sketching out your design and defining the color scheme as depicted in the video above. Be sure to fill the entire space with small pieces of paper.
Lesson #18
Romanesque VS. Gothic Architecture
Project: Follow along with the video in order to learn the differences between Romanesque and Gothic Architecture. Towards the end of the video, there is a project you can create as well! If you do not have all the materials, get creative! You can use cardboard instead of illustration board. Instead of colored cellophane, you can use tissue paper.
Lesson #19
Renaissance: Leonardo da Vinci
Project: Create your own invention in the style of Leonardo Da Vinci. Be sure to create multiple sketches that explain what your invention is! Add notes that detail your invention, but with a twist! Da Vinci wrote backwards from left to right. You may want to practice this exercise. Once finished, you should be able to hold your sketch to your body, while looking in a mirror, the words will appear to be read like “normal”. See image below for an example.

Lesson #20
Renaissance: Michelangelo
Project:
- Using Michelangelo’s painting technique, recreate a story you want to share.
- Sketch out a quick design of what you want to draw.
- Flip your piece of paper over so you do not see your sketch
- Tape your paper to the bottom of a table or desk
- Using a medium of your choice, recreate your story. *Do not be hard on yourself! This may not turn out to be your best artwork. This is all about experience!
- Be sure to sign your artwork like the artist you are!
Lesson #21
Northern Renaissance: The Arnolfini Portrait by Jan van Eyck
Project: Pick your favorite celebrity couple (or you can pick any couple you want!) Re-create the portrait of Arnolfini. Be sure that you are using symbols that represent the couple in your artwork. In your reflection, describe who the couple is, and what symbols you used, what they mean and why.
Lesson #22
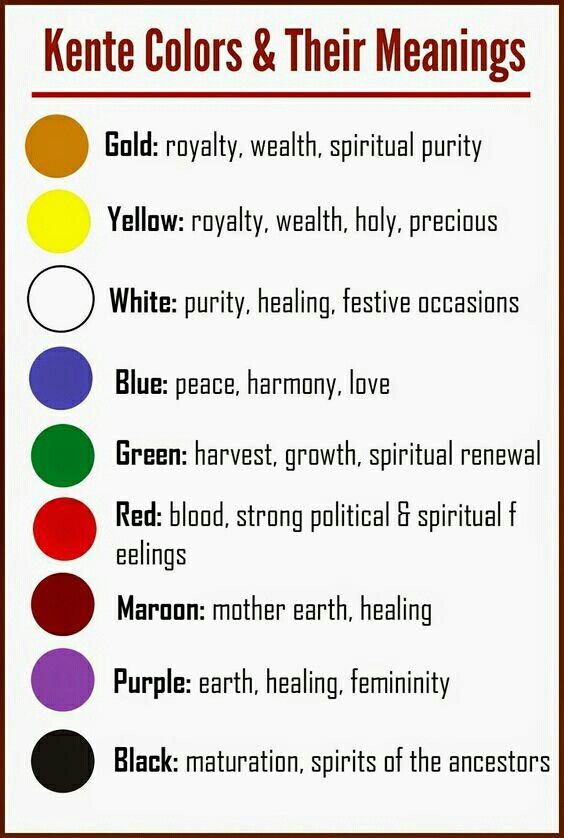
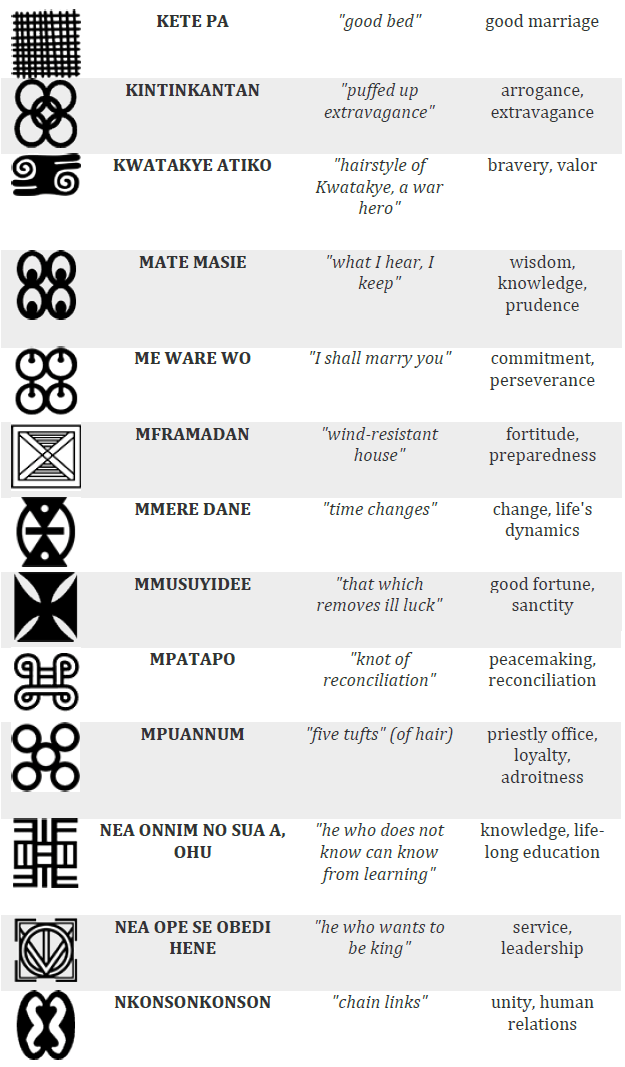
African Culture: Kente Cloths
Kente cloth is claimed to have its origin from the Akan-Ashanti kingdoms in Ghana using brightly colored fabrics with patterns and designs that symbolize different meanings and used for African Royalty. Watch the video below to learn more about Kente Cloths.
Project: Using a medium of your choice, create your own Kente cloth that describes who you are! See the images below for guidance. Be sure to explain what patterns and colors you chose and why they represent you.
Science Art Lessons
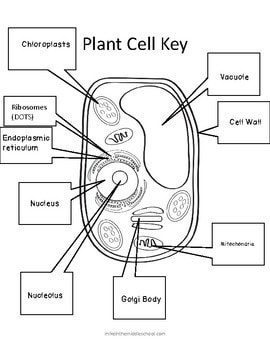
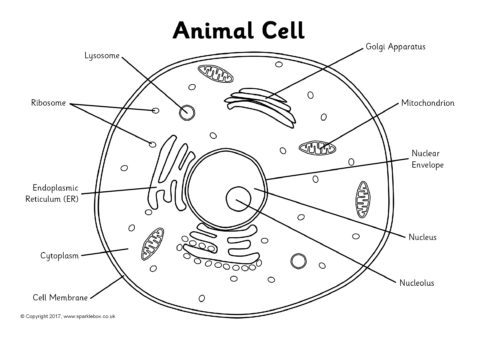
Lesson #23
Plant & Animal Cells
Project: Using household items, recreate a plant or animal cell. Be sure to correctly label your plant or animal cell! You can use the images below for reference. If you like this project, create both the plant & animal cell.